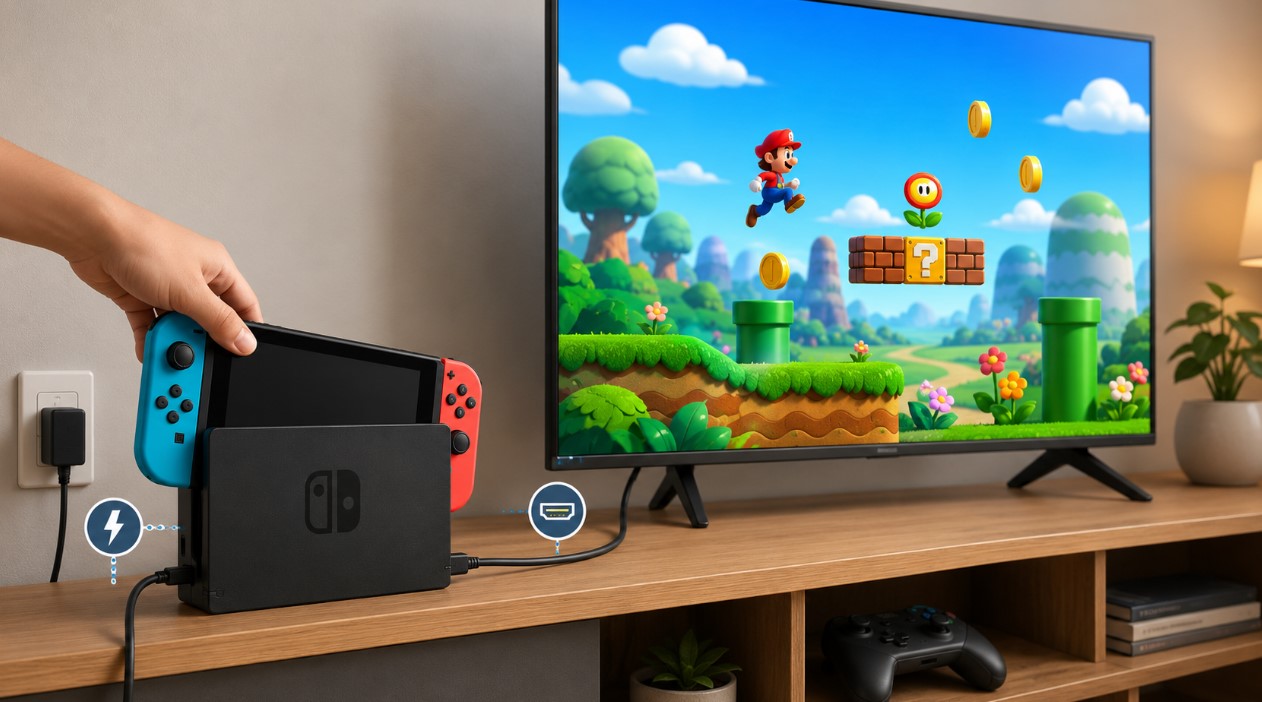
How to Connect Switch to TV Without Losing Your Mind?
You’d think this would take thirty seconds. Slot the console into the dock. Done. Go play something. And usually? It does. But then there’s the other version of this story – the one where you get a black screen, the TV insists there’s no signal, you’re jabbing the input button on the remote as it owes you money, and somewhere in the back of your head, a voice is going “did I just brick it?” You didn’t. Almost certainly. You just don’t know how to connect Switch to TV properly?
The good news is that both Switch generations connect to a TV the exact same way – console goes in dock, dock goes to TV – and the differences come down to cables, power, and what your telly can actually display. The bad news is that Nintendo changed enough between the two that mixing up your gear can leave you staring at nothing.
So here’s the whole thing, both models, plus the troubleshooting that actually works.
What’s in the Box (and Why It Matters)?
Before anything else, check what you’ve got. This is where most setup headaches start.
Every original Nintendo Switch and Switch OLED ships with three things you need: the dock, the AC adapter, and an HDMI cable. Same deal with Switch 2 – dock, charger, HDMI cable – but the parts themselves aren’t the same, and that’s the whole trap.
The Switch 2 runs on a 60W power supply. The original Switch used a weaker one. The Switch 2’s included HDMI cable is an Ultra High Speed cable, while the original shipped with a plain High Speed cable. Look at the actual printing on the cable sleeve – Nintendo labels them.
Can you swap them? Sort of, in one direction, but you really shouldn’t. Running a Switch 2 off an old Switch charger and an old HDMI cable is asking for flakiness, dropped signal, and 4K that never shows up. Don’t mix your wires. It’s the cheapest problem to avoid and the most annoying one to diagnose.
And one more thing before you start hunting for a dock: the Switch Lite cannot connect to a TV. At all. No video output, no workaround, no adapter that fixes it. It’s a handheld-only machine by design. If you own a Lite and you’ve been searching for a dock, I’m sorry – that’s the answer, and it’s a hard no.
| What You Need | Original Switch / OLED | Switch 2 |
|---|---|---|
| Dock | Included (OLED dock adds a LAN port) | Included, with a built-in cooling fan |
| Power | Standard Switch AC adapter | 60W AC adapter |
| HDMI cable | High Speed | Ultra High Speed |
| Max TV output | 1080p | 4K at 60fps (or 1080p/1440p up to 120fps) |
| Wired internet | LAN port on OLED dock only | Gigabit Ethernet built in |
| Extra ports | 2× USB-A | 2× USB-A |
| Works on TV at all? | Yes (Lite: no) | Yes |
The Setup, Step by Step
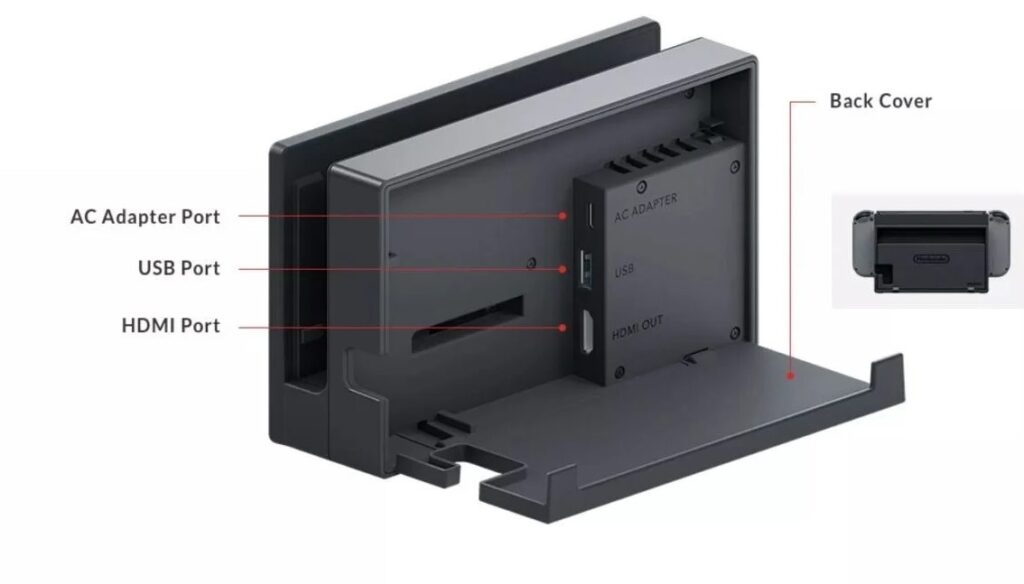
Right. Cables sorted, let’s actually do this. Open the back of the dock – on the original Switch, there’s a little flap on the rear that pops off, hiding three ports. Switch 2’s ports sit in the same area. Either way, you’re looking for three labels: AC ADAPTER, HDMI OUT, and (on OLED and Switch 2) LAN.
Now, order matters more than people think:
- Plug the AC adapter into the dock first, then into the wall. The dock needs power before anything else makes sense.
- Run the HDMI cable from HDMI OUT on the dock to any HDMI port on your TV. Note which numbered port you picked. HDMI 2, HDMI 3, whatever – remember it.
- Close the flap, tuck the cables, then slot the console in. The screen is facing the same way as the front of the dock. It should sit snug, not wobbly.
On the original Switch, you’ll hear a soft click, and the screen goes dark as it hands off to the TV. On Switch 2 you get a little LED on the side of the dock lighting up. Then grab your remote, switch your TV to that input you memorized, and Mario should be sitting there waiting.
Total time: about two minutes if you’re not fighting a cable spaghetti situation behind the TV.
One detail that catches Switch 2 owners out constantly – the console has two USB-C ports, one on the bottom and one up top. The top one is for charging and accessories. Video output only runs through the bottom port. That’s why the console won’t sit upside down in the dock, and it’s why a lot of third-party dock complaints trace back to somebody plugging into the wrong hole.
How to Connect Switch to TV Using the Wrong Dock (Don’t)?
Look, I know third-party docks are tempting. The official Switch 2 dock isn’t cheap, they’re bulky, and a slim travel dock that fits in a backpack sounds great.
But this is genuinely a “here’s the catch” moment.
The Switch has a long, ugly history with third-party docks. Back in 2018, there was a whole saga of budget docks bricking consoles – power delivery being handled sloppily, the console frying, Nintendo shrugging. It got fixed over time, mostly, but the reputation stuck for good reason.
And Switch 2 has revived the problem in a new flavour. Firmware updates have repeatedly broken third-party dock compatibility, to the point that sellers now advertise their docks by the console firmware version they currently work with. Read that again. You’re buying an accessory that a Nintendo update might switch off next month.
If you want a travel dock, fine – plenty of people run them without drama. Just go in knowing:
- Power matters most. Underpowered docks are where the horror stories come from. Switch 2 wants serious wattage; a random 30W phone charger isn’t going to cut it.
- It has to hit the bottom USB-C port. Anything else won’t carry video.
- Compatibility isn’t permanent. A firmware update can break it, and Nintendo owes you nothing.
For a permanent living-room setup? Just take the official dock. It came in the box. It works. It has a fan in it now, which the original didn’t, and that fan exists for a reason.
What Does Your TV Actually Get?
Here’s where the two generations genuinely part ways, and it’s worth knowing before you go adjusting settings.
The original Switch and the OLED model both cap out at 1080p on a TV. That’s it. No 4K, no fancy refresh rates, no HDR. Docking gives you a modest clock boost over handheld mode, and that’s the extent of it. Anyone selling you a “4K Switch dock” for the original console is selling you an upscaler at best.
Switch 2 is a different animal. Docked, it pushes 4K at up to 60fps through a custom NVIDIA chip, with HDR10 support. Drop the resolution and you get headroom – 1080p or 1440p at up to 120fps, on the games that support it. Even when a game doesn’t render at 4K natively, the docked output gets upscaled to 4K on a compatible display.
Now, the caveat that tripped up a lot of early adopters: VRR does not work while docked. Nintendo’s website originally said it did, then the company corrected itself and apologised for the error. Variable refresh rate is handheld only, on the console’s own screen. If you bought a fancy VRR-capable TV specifically for Switch 2, that’s a rough one, and the forums were not gentle about it.
| Feature | Original Switch | Switch OLED | Switch 2 |
|---|---|---|---|
| Docked resolution | Up to 1080p | Up to 1080p | Up to 4K |
| High refresh on TV | No | No | 120fps at 1080p/1440p |
| HDR on TV | No | No | HDR10 |
| VRR on TV | No | No | No – handheld only |
| Dock has LAN | No | Yes | Yes |
| Dock has a fan | No | No | Yes |
Settings Worth Poking at Once You’re Up
Don’t skip this bit. A few menu toggles make a real difference, and most people never touch them.
Head into System Settings → TV Output. On both generations you’ll find TV Resolution, and it’s usually set to Automatic, which is fine – but if your TV is being stubborn, forcing 1080p manually is a classic fix.
RGB Range is the sneaky one. Set to Automatic by default, it decides how black your blacks are. If your games look washed out and grey, try flipping it to Limited Range. If they look crushed and murky, try Full. Your TV has an opinion on this too, buried in its own picture menu, and the two need to agree.
Screen Size matters if you’re getting cut-off edges. Some TVs overscan by default, chopping the outer few percent of the image – which is how you lose half your health bar. Either shrink the output in Switch settings, or find your TV’s picture mode called something like “Just Scan,” “Screen Fit,” “1:1,” or “Full Pixel.” Every manufacturer names it something different, because of course they do.
And Match TV Power State is the quality-of-life one nobody enables. Turn it on and your Switch will power the TV on and switch to its input automatically when you dock it, over HDMI-CEC. Your TV needs CEC turned on too, and – surprise – every brand calls that something different as well. Anynet+ on Samsung. Bravia Sync on Sony. Simplink on LG. Same technology, different marketing.
How to Connect Switch to TV When the Screen Stays Black?
Okay. This is the section you actually came for, isn’t it?
The console’s docked, the light’s on, the TV says no signal. Deep breath. This is nearly always fixable, and it’s nearly always one of four things.
Work through these in order. Don’t skip ahead:
- Check the obvious first. Right TV input? Actually, the right one, not the one you think it is? Try each HDMI port on the TV one by one. And confirm the HDMI cable is properly seated in the dock – Switch dock ports are a bit stiff, and a cable that looks in can be a millimetre short.
- Try a different HDMI port and cable. TVs kill HDMI ports quietly all the time. If port 1 is dead, port 3 might be fine. Same with cables. This is boring advice, and it solves an embarrassing number of cases.
- Do the full power cycle. This is the big one, and it’s straight out of Nintendo’s own support playbook. Unplug the AC adapter and HDMI cable from the dock and from the wall. Leave everything disconnected for at least 30 seconds. Then plug the AC adapter into the dock and the wall first, wait a moment, then connect the HDMI, then dock the console. That order actually matters – the dock needs to be powered before it negotiates a video handshake.
- Hard reset the console. Hold the power button down for about 12 seconds to force it off. No warning screen, no menu, it just dies. Then press power once to boot back up. This clears a surprising amount of weirdness.
- If none of that works, plug your Switch into a different TV. If it works there, your TV or its HDMI port is the problem. If it doesn’t work anywhere, the dock’s likely the culprit – and docks do fail, especially if the console has been shoved in and out a thousand times.
One last note for Switch 2 owners specifically: if you’re on a third-party dock and it stopped working right after a system update, that’s not a coincidence, and there is no clever fix. That’s the firmware compatibility thing biting. Official dock, or wait for the manufacturer to catch up.
FAQ
Can I connect a Switch Lite to a TV?
No. The Switch Lite has no video output whatsoever – it’s handheld-only by design, and no dock or adapter changes that.
Can I use my old Switch dock with a Switch 2?
Not properly. Switch 2 needs its 60W power supply and higher-bandwidth HDMI cable to hit its full output. Sticking with your old gear is a recipe for signal problems and no 4K.
Does the Switch 2 really do 4K on a TV?
Yes – up to 4K at 60fps when docked, with HDR10. Games not rendering at 4K natively get upscaled to it on a compatible display.
Does the Switch 2 support VRR on my TV?
No. Nintendo confirmed VRR works in handheld mode only, after initially publishing incorrect info on its own site.
Why does my TV say “no signal” when I dock the Switch?
Usually wrong input, a loose or faulty HDMI cable, or a dock that needs power-cycling. Unplug everything for 30 seconds, reconnect the AC adapter first, then HDMI, then the console.
Can I connect a Switch to a TV without the dock?
Not reliably or safely. Third-party USB-C adapters exist, but sloppy power delivery has bricked consoles before, and Switch 2 firmware updates keep breaking third-party hardware.
Why do my games look washed out on the TV?
Try flipping RGB Range in TV Output settings between Automatic, Limited, and Full – and make sure your TV’s own black level setting agrees with it.
And That’s Your Setup Sorted
Docking a Switch is one of those tasks that’s either trivially easy or maddeningly stubborn, with very little in between. The fix is almost never dramatic. It’s a cable in the wrong port, a TV on the wrong input, or a dock that needed thirty seconds unplugged to remember what it was doing.
Get the right wires with the right console, keep the official dock for the living room, and enable Match TV Power State so you never have to hunt for the remote again.
P.S. Fuel our creative fire by sharing this post across your social media feeds and dropping it into your bookmarks for quick future access. When you are ready to build something legendary, reach out to the YaninaGames team directly to discuss potential creative or commercial collaborations. Every share and partnership helps us level up, so let’s connect and craft unforgettable gaming experiences together!
1 Comment
Your comment is awaiting moderation.
Some really nice and useful info on this website , likewise I think the design has good features.
[…] Platforms: PlayStation 5, Xbox Series X|S and Nintendo Switch 2. […]