Fire Emblem Fortune’s Weave Guide: The Calendar Is the Real Difficulty
Most strategy guides for this game will hand you a tier list and a route recommendation. Both are useful. Neither is where your run is actually being decided. Fortune’s Weave runs on a seven-day week, and six of those seven days belong to a different god. Serve Aurora on a Monday and the gauge fills faster, the result is guaranteed Perfect, and the Motivation you spent comes back. Serve her on a Thursday and you get a slower fill and you have paid for it.
That is a real, repeating, compounding difference, and it means the strongest thing you can bring to this game is not a build. It is a schedule.
So here is the guide written as one – a working Dagsion week, day by day, followed by the three things that do not fit inside a week. The game launched on September 17 and the community has had a month to work out the loop, which is long enough for a clear picture to form.
| God | Holy Day | Blessing at Levels 1 / 2 / 3 |
|---|---|---|
| Aurora | Monday | Halves physical damage taken / Halves magical damage taken / Neutralises enemy Underworld Boons |
| Mars | Tuesday | Hit +50 on physical attacks / Restores HP on a kill / Str +5 |
| Smyrnos | Wednesday | Hit +50 on magic attacks / Magic range +1 / Mag +5 |
| Jurah | Thursday | Negates effective damage / Blocks follow-up attacks / Blocks critical hits |
| Kalla | Friday | Avo +50 / Spd +5 / Mov +2 |
| Credna | Saturday | Visibility +5 / Zero weapon durability cost / Army attacks first in the enemy phase |
| Fortuna | None | The rewind. Arrives in a Part 1 story battle and needs no service |
Print that, screenshot it, whatever you like. The rest of this follows from it.
Monday Through Thursday: Build Your Defensive Floor First
Temple service works like this. Each week you pick two units at a god’s temple, each spends one point of Motivation, and the god’s gauge fills over time. On that god’s holy day, the gauge fills faster, the result is guaranteed Perfect, and the Motivation gets refunded – so holy-day service is strictly better in both currencies at once.
Which means the service order worth following is not alphabetical or whichever temple is closest. It is a priority list:
- Credna first, for the Visibility +5 at Level 1, because fog-of-war maps are where unprepared armies get dismantled and seeing five tiles further is the cheapest insurance in the game
- Aurora second, because halving physical damage army-wide for a turn is the single most forgiving button available and it scales with how badly a map is going
- Mars or Jurah third, depending on your army – Mars for a physical team that keeps missing, Jurah if effective damage and enemy criticals are what keep killing your units
- Kalla last in most runs, though she is excellent if you are chasing low turn counts, since Mov +2 at Level 3 is a turn saved on nearly every map
- Smyrnos sits where your mage count puts him, which on a Theodora or Leda army is considerably higher than on Dietrich’s
Notice that Jurah’s third level blocks critical hits outright. That is not a damage reduction, it is a denial, and on Hard it is the difference between a Classic-mode run surviving an ambush and ending there.
One scheduling detail that catches people: temple warps become available in the capital and send you to a god’s minor temple out in the remote areas. Combined with Posthouses – visit them early to open carriage travel, and remember you can only carriage to somewhere you have already been – you can usually reach the right temple on the right day without burning half a week travelling.
Friday and Saturday: Spend the Week’s Momentum
The calendar runs on four turns per day – morning, day, evening and night, six hours each – which gives you twenty-eight actions a week and a lot of ways to waste them.
Two habits fix most of that waste.
First, pin your events. The calendar lets you pin up to three days, and the things worth pinning are the timed ones: holy days, psychic consultations, arena exhibitions. Pin them a few days ahead so you have travel time back to Dagsion rather than discovering on the morning that you are three carriage rides away.
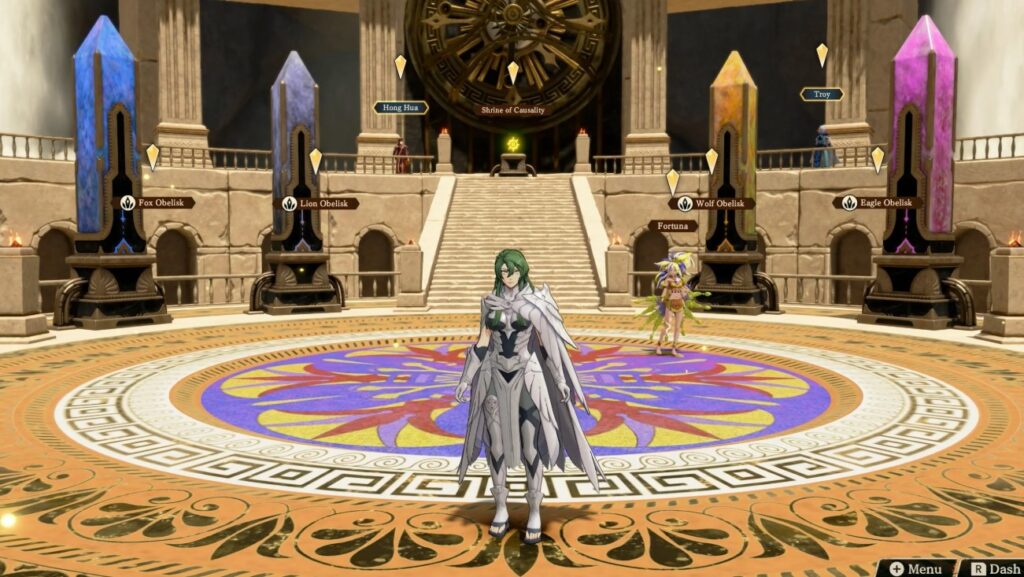
Second, read the Adventure Guide’s star ratings as instructions rather than suggestions. Its first page tells you what to do next and who to recruit, with Dagsion tasks in the left column and World Map tasks on the right. Three-star tasks are top priority. Two-star and one-star tasks should be cleared before your next major battle, not after it.
Shopping belongs in this part of the week too, and the single most useful economic fact in the game is that Dagsion is not the best shop. Surrounding cities frequently carry better gear. Regia specifically has cheap gifts and cheaper licenses, which matters enormously once you start reclassing through certification exams. Some towns specialise in a weapon type, some sell items available nowhere else, and some sell maps that show every location in their local area – which is the fastest way to stop wandering.
Fire Emblem Fortune’s Weave Guide to Sunday, the Only Day That Resets
Sunday is administration day, and treating it as one changes your whole week. Everything weekly resets on Sunday. Unit Motivation – shown as flames – resets then, shops restock then, and meals are 50% off on Sundays.
That discount is more significant than it looks, because meals partially restore Motivation, and Motivation is what temple service spends. So Sunday is when you refill the resource that Monday through Saturday consumes, at half price.
The full weekly activity list, all of which resets:
- Interacting with the Pale Raven, which raises your protagonist’s Support Level.
- Giving gifts to each potential recruit, once each per week.
- Sharing meals, limited by whichever dishes are on offer that week.
- Cleaning or worshipping at a temple, which raises that god’s Blessing Level and earns Renown.
- Arena training, which raises weapon skills.
- Feeding the animals at the stable, which exists only in Cai’s campaign.
Two recruitment tricks worth folding into Sunday specifically. Give gifts to characters you have not recruited yet, because doing so makes them show up as dinner guests, which then raises their Support without costing you a gift. And check for gold borders on names – a gold border means new dialogue or a question waiting, and answering opinion questions correctly can raise an ally’s Support Level on its own.
The one genuinely punishing timing rule in the game is that support conversations are only viewable for a limited window. Visit the Innkeeper promptly or you lose them, although conversations that are currently locked do open up in later chapters. Making the Innkeeper a Sunday habit solves this permanently.
The Thing That Does Not Fit in a Week, Part One: The Blaze Gauge
Now the mechanic that will kill units who were winning. Blaze Arts are the new resource system, and each of the four protagonists has their own. They cost health rather than weapon durability – the comparison people keep reaching for is the Gaiden and Echoes magic system, which is correct.
Here is the part that is easy to miss. Spending Blaze Arts fills that unit’s Blaze gauge, and while the gauge is filling it grants benefits. So far so good. But when the gauge reaches full, that unit’s health is halved for the rest of the battle.
Read that twice. The reward track and the punishment are the same track. There is no warning sound and no confirmation prompt – you simply arrive at the top and your protagonist is suddenly at half health against a boss.
The practical consequences:
- Count your Blaze Arts per battle the way you would count staff charges, not the way you would spend a free ability.
- Stop short of full on purpose, since the benefits accrue on the way up and the penalty lands only at the ceiling.
- Chapter-ending fights are where to cash out, because halved health matters far less when the map is about to end.
- Leda is the exception worth knowing – her Blaze Arts are songs that buff multiple nearby allies, and her Song of Passion raises Strength and Magic, so her gauge is paying the whole army rather than one unit.
- Dietrich’s Blaze Art closes gaps, which makes his gauge genuinely tempting and therefore genuinely dangerous.
Fortuna’s Blessing – the rewind – is the safety net, and its economics differ by difficulty. On Normal it is free. On Hard each rewind costs five Divine Sand, and reporting suggests roughly twenty rewinds per battle if you spend Divine Sand on nothing else. Aurora’s Blessing costs fifteen Divine Sand on Normal and twenty on Hard, so on Hard you are constantly trading rewinds against active Blessings.
That trade is the real Hard-mode difficulty, and it is worth stating plainly: on Hard, every Blessing you fire is rewinds you no longer have.
Part Two: There Is No Weapon Triangle
This is the change that will catch every returning player, and it has been confirmed since launch. The weapon triangle is gone. In its place is a set of specific matchups and flat weapon traits, which reward knowing the list rather than memorising a loop.
| Rule | Effect |
|---|---|
| Magic versus heavy armour | Strong |
| Archers and projectiles versus flyers | Effective |
| Spears versus land cavalry | Best answer |
| Cavalry versus mages and archers | Closes distance fast to reach them |
| Swords | 1.2x damage on follow-up attacks |
| Axes | Always deal at least 5 damage on a hit |
| Gauntlets | Raise evasion against non-gauntlet weapons |
| Flying units | Ignore impassable and harsh terrain |
That axe rule deserves a moment. A guaranteed minimum of five damage per hit means axes never fully whiff against armour, which makes them the reliable chip option in a game where some enemies are built to eat physical attacks.
And the sword rule pairs directly with Kalla’s Blessing, since Spd +5 at Level 2 generates more follow-ups, and every follow-up on a sword is worth 1.2x. Blessing choice and weapon choice are the same decision made twice.
Two battle-prep habits that go with this. Swap Spaces before a battle lets you reposition units, check enemy stats and scout hazards and ambush points, which is where the matchup table actually gets applied. And once battle starts, ZL shows every enemy’s attack range – park allies just outside it, or deliberately place an advantaged unit inside it as bait for the aggressive ones.
Fire Emblem Fortune’s Weave Guide to Picking Your First Obelisk
Part three, and the question everyone asks first.
Four Flame Lords, four routes, twelve Part 1 chapters each, then six War chapters and six Salvation chapters. All four share a single save file, and you switch between them at the Pale Raven’s Perch – which makes the first pick far less permanent than it feels. Eshmel, the customisable protagonist in the 1454 storyline, can move between all four perspectives at will, which is the structural conceit holding the whole thing together.
What carries over when you finish a Flame Lord’s story is substantial: Support Levels, subquest rewards including Renown, discovered world map locations, Blessing progression and hidden class options. So later routes are genuinely easier, which is an argument for a deliberate order.
Cai, the Fox Obelisk, is the recommended first pick. His route teaches the Part 1 loop at a steady pace, builds Renown quickly through Kindness Quests – the ones marked with a hand pin – and keeps the world map small. He farms world map nodes, captures and feeds mounts at the stable, and his Mentorship system opens up classes. His Blaze Art is an area strike, which is rare among the four.
Theodora, the Wolf Obelisk, is the veterans’ route and the one built on Battalions. She recruits soldiers at town nodes, sends them on collection runs, attaches them to units for stat bonuses and spends their limited charges on Gambits. Bonaventure hands her delivery quests with item quotas, and the icon shorthand is worth learning: fish in water, crops in fields, minerals in mountains. Her route also opens sea travel, and her Blaze Art has the longest range of the four.
Dietrich, the Lion Obelisk, is the combat route with full overworld access from the start. His Answerer’s Cry summons nearby enemies after each world map turn for a small Renown gain – and the honest assessment from guides is that this is a poor long-term strategy. His real income is Dread Warrior duels from the Headhunter, which pay gold, Renown and a new Combat Art, and he can pass learned arts to allies, so his rewards benefit the whole army.
Leda, the Eagle Obelisk, is support and exploration. Town performances pay Renown and money, tavern shows teach her Blaze Arts, outdoor shows find secret map locations, and her mixology drinks buff unit stats. She cannot field Battalions at all, which gives her route the lowest upkeep of the four.
The order most guides land on is Cai, then Theodora, then Dietrich, then Leda – with Dietrich moved to the front only if you want an immediate combat test. Difficulty itself is set globally before the prologue as Normal or Hard plus Casual or Classic, and difficulty can be adjusted afterwards at the Obelisk Chamber. Route choice does not change it.
FAQ
Which route should you play first in Fortune’s Weave?
Cai’s Fox Obelisk route, which teaches the loop at a gentle pace and keeps the world map small. The commonly recommended order is Cai, Theodora, Dietrich, Leda, with Dietrich first only if you want an early combat challenge.
Which god should you serve first?
Credna, for the Visibility +5 that makes fog-of-war maps readable, then Aurora for army-wide damage halving. Serve each on their holy day, since that fills the gauge faster, guarantees a Perfect result and refunds the Motivation spent.
What happens when the Blaze gauge fills?
That unit’s health is halved for the rest of the battle. The benefits accrue as the gauge rises, so stopping short of full is usually correct unless the map is about to end.
Is there a weapon triangle?
No. It has been replaced with specific matchups – magic beats heavy armour, archers beat flyers, spears beat land cavalry – plus flat traits like swords dealing 1.2x on follow-ups and axes always dealing at least 5 damage.
How does the rewind work?
Fortuna’s Blessing rewinds actions and arrives during a Part 1 story battle without needing temple service. It is free on Normal and costs five Divine Sand per rewind on Hard, competing with Blessings for the same pool.
Does progress carry between routes?
Yes. Finishing a Flame Lord’s story carries over Support Levels, subquest rewards and Renown, discovered map locations, Blessing progression and hidden class options.
What resets on Sunday?
All weekly activities, unit Motivation and shop stock. Meals are also half price that day, which makes Sunday the natural time to restore the Motivation your temple service spends.
Keep a Diary, Win the War
What Intelligent Systems has actually built here is a management game wearing tactical RPG armour, and the giveaway is that the most powerful systems in it are all scheduled rather than purchased.
Blessings come from service on a specific weekday. Motivation comes back on a specific day at a discount. Support conversations expire if you do not collect them. Pinned events demand travel time you have to budget in advance. None of that is a stat you can grind – it is a diary you either keep or do not.
So the version of this guide that fits on a sticky note: serve Credna then Aurora, always on their holy day. Restock and eat on Sunday. Pin three events ahead. Clear three-star tasks before any major battle. Stop the Blaze gauge short of full. Start with Cai.
Do those six things and the tactical layer stops being the hard part, which is exactly when a Fire Emblem game becomes fun rather than stressful.
Balor is waiting in 1454 either way. Show up rested.
If this swapped a month of improvised weeks for a schedule you can actually run, pass it along on X, Reddit or whichever thread is still arguing about whether Kalla outranks Jurah – small writing teams travel by word of mouth and nothing else. Bookmark it as well, since the community is still mapping Part 2 Group Service and the hidden class requirements, and we revise this page rather than filing a fresh one as the sheet fills in. And if creative or commercial collaboration brought you here, write to the YaninaGames team directly – every day is our holy day.